


Price: ₹999 - ₹251.00
(as of Nov 11, 2024 23:25:20 UTC – Details)
From the manufacturer
Installation Kit/What generally comes in the pack?


Five Easy Steps to Apply the Screen Protector
Before you get started, make sure to wash your hands and let them dry.
Also, choose a clean space to avoid dust or other particles. You may even switch off your fan, if required.
Remove your phone’s cover or any existing Screen protector.
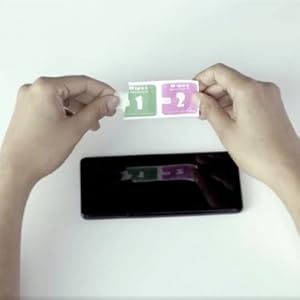

Step 2: CLEAN
Clean the mobile screen of any kind of dust. For this, first clean the screen using the Wet wipe and then the Dry wipe.
This is to ensure that no bubbles come up during application.


Step 3: ALIGN
Hold the protector from the edges and take care not to touch the sticky side.
Align the device starting with any one reference point, which could be the speaker or the camera lens at the top.
The Home button or The Logo can also be used as reference at the bottom.


Step 4: DROP
Using the weight of the protector, gently drop the Protector onto the screen


Step 1: PREPARE


Step 2: CLEAN


Step 3: ALIGN


Step 4: DROP


Step 5- PRESS
Press the Protector with a clean cloth to remove any remaining bubbles
What if something went wrong?
What if the Protector isn’t aligned to the screen?
Just remove it quickly from the corner and repeat the application process. Take care
· To hold the protector on the sides.
· Not to hold the protector on the sticky side.
What if there are bubbles on the screen?
Remove the protector and clean the screen again with the wipes, to remove the dust which is causing the bubbles to appear. You may use a tape to remove any dust from the tape as well.
Repeat the application process after cleaning.


Item Hardness: 9H Hardness, precise laser cut, 2.5D rounded edges, HD Clarity, Bubble free adhesive and easy to install
Material Type: Tempered Glass Silicon
Included Components: Tempered Glass Screen Protector and Installation Kit
Warranty: 3 months warranty on the product (Warranty card Inside the package)
Compatible Device: iPhone XR / 11









Reviews
There are no reviews yet.